Site Progress Check #1
I started working on this website late August 2015 as a means to familiarize myself with the world of coding and web development. It’s generated with Jekyll and hosted on GitHub (view source). I’ve learned a lot around HTML, CSS, and Markdown, but there’s still much (much, much) more to learn.
In this “progress check” I’ve listed all the features I’ve included in my site since it’s inception and commented on the process. In general, I knew I wanted two things from this site:
- Something minimalist and clean
- Everything “from scratch”…
… Rather than importing a theme, I decided to begin with Jekyll’s default settings and styling and try to build everything myself so that I could learn more from the process. I’ve hence realized that building everything myself was a lot more than I bargained for and nigh impossible for someone with as little experience as myself, so I’ve employed the help of sites like Flickr and Mailchimp and others as I’ll explain below.
The List
Here’s everything I’ve added to my site (click to jump):
- A homepage
- Tsatchi Instagram widget to homepage
- An about page
- A resume page
- Downloadable resume PDF
- Modified footer content
- Mailchimp email list to blog page
- Flickr embedded photo slideshows for Snaps posts
- Social media share buttons
- Commentit comments posting
The Details
Here’s a closer look at my thoughts and procedures for those additions.
###Homepage### The default Jekyll theme integrates the blog page and homepage into one. That is to say, there isn’t really a homepage. This is common for most blogs and personal websites, but I wanted to feature a landing page that’s more visually compelling. Before including the tsatchi Instagram plugin I simply included a favorite photo of mine that I had taken recently. I find this homepage to be a simpler way for users to be introduced to my site and then navigate to the blog or about page, rather than instantly being bombarded with the blog lists with vague seeming titles and no visual aesthetic.
I created this homepage by first creating a blog page, where I dumped the posts list snippet that was originally within index.html. This is Jekyll’s post list code:
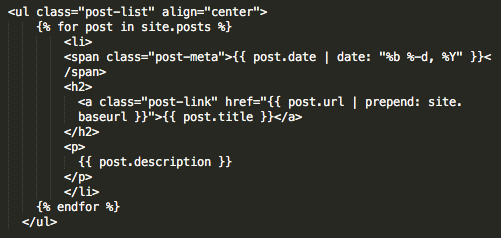
Note: I had to use a screenshot because embedding the code through Markdown only displays the HTML. Jekyll locally uses both HTML and the Liquid templating language (the stuff in curly braces).
From there, my index.html was blank and I filled it with the tsatchi Instagram plugin descried below.
###Tsatchi Instagram widget to homepage### As I mentioned above, I wanted my homepage to be visual and simplistic, so originally I simply embedded a favorite photo of mine. That’s when I realized I already did that all the time with Instagram. That began my hunt for a single image Instagram widget. I chose Tsatchi’s Instagram widget for the following reasons:
- It has neat hover and slideshow animating
- Clicking on the image links directly to the photo on Instagram, not a 3rd party
- It’s automatic and instantaneous - I could have used a Flickr slideshow but would have had to manually upload the photo and put it in an album.
I’ve only found two drawbacks:
- Long load time (partially due to my location, China)
- The size of the widget does not change with the size of the user’s window - I’m still looking into this..
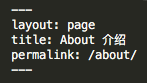
###An about page### As with almost all websites and personal websites in particular, I needed an about page to introduce myself and what content I’ll be blogging about. This was also where I included my resume page.
To create my about page I followed the standard procedure outlined by Jekyll. I simply created an about.md (Markdown file) within my site’s kylegraycar.github.io folder. I then added the appropriate YAML front matter like so:
###A resume page### As mentioned above, my resume page is embedded within my about page. This was my first foray into creating classes and ids with CSS.
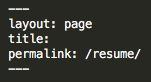
I chose not to display my resume prominently on the header of my site because it already would naturally fall within an about section. To do so required a simple little trick. The Liquid coding on the header locates the YAML titles of .md pages (see about front-matter image above) and automatically includes them on the header. So, for pages that I don’t want included on the header I simply leave the title blank, like so:
I have also used this technique for my mailing list notification pages (subsription confirmed, etc.).
I still mean to include a Chinese version of my resume.
###Downloadable resume PDF### In addition to displaying my resume as a page within my site, I also wanted to provide users with the option of viewing and downloading a more official PDF version.
I originally had a kyle-graycar-resume.pdf file in my assets folder, but my brother showed my how this made the URL unnecessarily long, and I should shorten the filename to resume.pdf and just include it in the main kylegraycar.github.io folder.
The original URL was: http://kylegraycar.me/assets/kyle-graycar-resume.pdf/, whereas the new URL is: http://kylegraycar.me/resume.pdf.
###Modified footer content### The vanilla Jekyll theme divides the footer into columns. The first includes contact info, and the second is a site description. I thought a site description wouldn’t be necessary for my site, as it’s pretty explicitly a personal website/blog. Thus, I deleted every column except one, centered everything, and left only my contact and social media profiles. Scroll down to the bottom of this page to check it out!
###Mailchimp email list to blog page### I wanted to include all the different methods for viewers to keep up with new posts on my site. The default Jekyll theme includes an RSS subscription option, but in my expereince few of my contemporaries use an RSS feed. In general, people seem much more accostumed to an email list for organizations, companies, and social media they subscribe to. For this reason and because it’s simply good practice for me, I decided to look into creating a mailing list users could subscribe to.
My first stop was to check out my sister’s website, Kima, which had a home-made email list subscribe form. Users who submit their emails have them added to a local text file. However, there are a few issues with this:
- There’s no way for users to unsubscribe (besides directly emailing her)
- Every time my sister wants to send an email to her subscribers, she has to copy paste the emails into her message
- No way of gathering information on who’s opening her emails
So, I decided to use Mailchimp. Mailchimp solves all of the problems listed above, and still allows a lot of customization for users if they want to. For instance, I custom-styled the subscribe form on my blog page. The HTML and CSS looks like this:
<!-- Begin MailChimp Signup Form HTML -->
<div id="mc_embed_signup">
<form action="//kylegraycar.us12.list-manage.com/subscribe/post?u=e90ebf818f100e659e91fd302&id=48a1711bb6" method="post" id="mc-embedded-subscribe-form" name="mc-embedded-subscribe-form" class="validate" target="_blank" novalidate>
<div id="mc_embed_signup_scroll">
<div class="mc-field-group">
<label for="mce-EMAIL">Join my email list to keep up on new posts!</label>
<div><input type="email" value="Enter email here" name="EMAIL" class="required email" id="mce-EMAIL"><input type="submit" value="Submit" name="subscribe" id="mc-embedded-subscribe" class="button">
</div></div>
</div>
<div id="mce-responses" class="clear">
<div class="response" id="mce-error-response" style="display:none"></div>
<div class="response" id="mce-success-response" style="display:none"></div>
</div>
<div style="position: absolute; left: -5000px;"><input type="text" name="b_e90ebf818f100e659e91fd302_48a1711bb6" tabindex="-1" value=""></div>
/**
* Mailing List CSS
*/
#mc_embed_signup{
text-align: center;
border-left:1px solid #000;
border-right:1px solid #000;
border-top:1px solid #000;
border-bottom:1px solid #000;
margin: auto;
width: 60%;
padding: 10px;
}
#mce-EMAIL {
-webkit-appearance:none;
background-color:#fff;
border-left:0px solid #fff;
border-right:0px solid #fff;
border-top:0px solid #fff;
border-bottom:1px solid #000;
color: $grey-color;
text-decoration: none;
font-family: $base-font-family;
font-size: 15px;
}
#mc-embedded-subscribe {
text-decoration: none;
font-weight: bold;
color: rgba(255, 30, 18, 0.79);
line-height: 1.5;
border: 1px solid #fff;
background: #fff;
margin: 10px;
-o-transition: .5s;
-ms-transition: .5s;
-moz-transition: .5s;
-webkit-transition: .5s;
transition: .5s;
font-size: 18px;
&:hover {
font-weight: bold;
border: 1px solid $red-color;
background: $red-color;
color: #fff;
border-radius: 4px;
}
}
Shoutout to my sister for letting me use her styling!
Another feature I really like about Mailchimp is that you are able to create your own custom pages for notifications like subscription/unsubscribe confirmation. On Mailchimp, navigate to the list you are interested in adding custom URLs to, then click “Signup forms.” Select the notification you want to customize, and then insert your URL in the form like below:
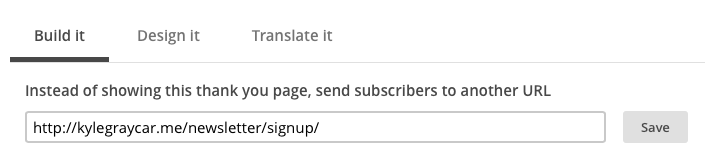
I’ve created custom URLs for the following notifications:
###Flickr embedded photo slideshows for Snaps posts### I wanted a way to present photos I’ve taken during my travels in a sleek, automated way. I first thought to check out Flickr, and discovered a couple new features that really helps automate the process.
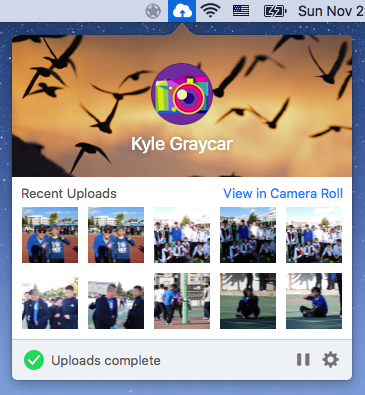
First, Flickr has a beta Uploadr tool that can automatically begin uploading photos from your Photos folder (or another designated source) to your Flickr Camera Roll.
Flickr also has a new slideshow URL embed that creates a nice minimal photo slideshow for different albums you create. Navigate to your album you want to embed, click the share arrow, select “Embed,” then copy paste the HTML into your post.
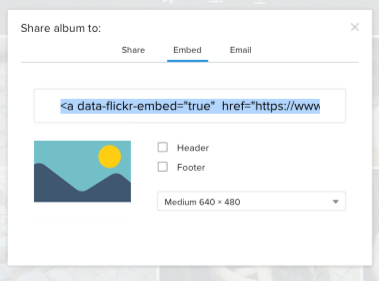
The code will look like this:
<a data-flickr-embed="true" href="https://www.flickr.com/photos/136459740@N03/albums/72157659591218285" title="Cute pets and strays"><img src="https://farm1.staticflickr.com/674/21442323474_24ed83a475_c.jpg" width="800" height="600" alt="Cute pets and strays"></a><script async src="//embedr.flickr.com/assets/client-code.js" charset="utf-8"></script>
###Social media share buttons###
I wanted to practice creating social media share buttons, too. I did my best to create these for every post in the least intrusive way. This meant creating a div class="social-media-share" in my post.html layout. After a small share icon, I created a table that would include the social media buttons in a row.
Facebook, LinkedIn, and Twitter have social media button generators that will share specific URLs. My challenge was that I wanted to make these buttons share every specific post, but include the button code in my default post.html layout. I discovered an inelegant solution: delete the URL in the plugin coding. Without a specific URL to share, the plugin automatically shares the default URL of the webpage it is embedded into.
Check out the FB generator, Twitter generator, and LinkedIn generator. Just for fun, I set the Twitter and LinkedIn buttons to Chinese.
Also, be sure to include the proper meta data to the head of your website. For how to integrate social meta into Jekyll sites, check out this post by Milan Aryal.
###Commentit comments posting###
The last feature I wanted to be sure to add was commenting for each post. Just like the social media share buttons, I wanted to include this within my post.html layout.
After a bit of research, it appears the main commenting platform developrs use is Disqus. After reading about concerns developers have with proprietary software like Disqus (and Mailchimp, for that matter), I decided to search for an open-source alternative. Besides, I felt like the Disqus commenting layout was too busy and cluttered for my taste.
That’s how I came to find Commentit.io. As of this post, Commentit is only a couple months old with 129 users registered. It has a nice, minimal layout for the comments form (see below!) that syncs with your Jekyll page’s default fonts and styling. When users submit a comment, this creates a pull request on my site’s repo. That’s how I approve the comment, which is stored in the front-matter of each post. I can then adjust the format and styling of all the comments myself.
What’s best, Commentit is open source and open to user suggestions by raising an issue on it’s Github repo. I’ve already raised two issues with it to help with simple grammatical erros and fixing a bug with posts that have Chinese. This was my first open source contribution :)!
Conclusion
That wraps up what I’ve done so far with my site. This post was REALLY long… so I’ll be sure to break these updates up on an as-the-feature-is-added basis. I would really appreciate any suggestions and comments!
Here are my next steps for the site:
- Make the tsatchi IG plugin frame responsive to window size
- Fix header styling
- A “Back to top” option at the bottom of posts
- Keep bloggin’ and adding content to the site!
Huge thanks to my brother, Joel Graycar, for introducing me to Jekyll, Github, and this entire beast, and for providing suggestions as I stumble along. Also thanks to my sister, Lauren Graycar, for sharing her design wisdom with me.
Thanks for reading!
